Mac PROBLEMS
Mac command line
mdfind
mdfind can find something in Mac
cal
cal launch a calendar
start/stop apache:
$ sudo apachectl start
$ sudo apachectl stop
remove dir:
rm -rf dir
brew install
Install homebrew
Mac install homebrew,we can use git as from: http://blog.jjgod.org/2009/12/21/homebrew-package-management/
$ sudo chown -R `wanggengzhou` /usr/local
$ cd /usr/local
$ git init
$ git remote add origin git://github.com/mxcl/homebrew.git
$ git pull origin master
Testing: brew search
install ruby:
$ brew install ruby
Configure the path: PATH=$(brew –prefix ruby)/bin:$PATH
$ vim ~/.bash_profile
input:
export PATH=$(brew --prefix ruby)/bin:$PATH
install jekyll:
$ gem update --system
$ gem install jekyll
Mac vim
vimrc configure
$ sudo vim /usr/share/vim/vimrc
input:
set ai                  " auto indenting
set history=100         " keep 100 lines of history
set ruler               " show the cursor position
syntax on               " syntax highlighting
set hlsearch            " highlight the last searched term
filetype plugin on      " use the file type plugins

" When editing a file, always jump to the last cursor position
autocmd BufReadPost *
\ if ! exists("g:leave_my_cursor_position_alone") |
\ if line("'\"") > 0 && line ("'\"") < = line("$") |
\ exe "normal g'\"" |
\ endif |
\ endif
File System
The path of QQ information:
~/Library/Containers/com.tencent.qq/Data/Library/Application Support/QQ
Questions:
can’t open file for writing
Maybe the file owner becomes root
Permission denied
cannot open .git/FETCH_HEAD: Permission denied
$ sudo chown -R .git/
Mac ssh need not to be root accout
Lauchpad icon information is in
~/Library/Application\ Support/Dock/*.db
ubuntu phpmyadmin
安装phpmyadmin在/usr/share/phpmyadmin目录下:sudo apt-get install phpmyadmin
重启apache:
$ sudo /etc/init.d/apache2 restart
dpkg -L phpmyadmin 看看安装在什么地方
http://localhost/phpmyadmin/
[转载]JS为什么 ++[[]][+[]]+[+[]] = 10 ?
转自:珠海GDG微信

为什么 ++[[]][+[]]+[+[]] = 10 ?
全文引用自:
http://www.aqee.net/can-you-explain-why-10/
首先,问这个问题 的人是个天才,他怎么会遇到这样的一个问题。其次,回答这个问题的人更是一个天才,我难以想象他会回答这个问题,更难以想象的是,他的回答是如此的详细和丰富和完整,真正称得上诲人不倦。
是的所有令人激荡不已的问题以及回答,现在多数出自: “栈溢出”
http://stackoverflow.com/questions/7202157/can-you-explain-why-10
既然遇到了这个问题,我们不妨也跟着提高一下。
这是一个Javascript语言题目,一个完全有效的等式,不信自己可以试一下,下面看看高人的题解:
++[[]][+[]]+[+[]]
如果把这段表达式拆分开来,它相等于:
++[[]][+[]]
+
[+[]]
在JavaScript里,+[] === 0是完全正确的。 + 会把一些字符转化成数字,在这里,这个式子会变成+""或0。
因此,我们可以简化一下(++ 比 + 有更高的优先级):
++[[]][0]
+
[0]
因为[[]][0]的意思是:获取[[]]的第一个元素,这就得出了下面的结果:
[[]][0]返回内部数组 ([])。
根据语言规范,我们说[[]][0] === []是不正确的,
但让我们把这个内部数组称作 A,以避免错误的写法。
++[[]][0] == A + 1,因为++的意思是“加一”。
++[[]][0] === +(A + 1);
换句话说,你得到的永远是个数值
(+1并不一定得到的是个数值,但++一定是)。
同样,我们可以把这一堆代码简化的更清晰。让我们把 A 换回成[]:
+([] + 1)
+
[0]
在JavaScript里,这也是正确的:
[] + 1 === "1",因为[] == ""
(这相当于一个空的数组的内部元素连接),于是:
+([] + 1) === +("" + 1),并且
+("" + 1) === +("1"),并且
+("1") === 1
让我们再次简化一下:
1
+
[0]
同样,在Javascript里,这是正确的:
[0] == "0",因为这是相当于一个有一个元素的数组的内部元素的连接。各元素会使用,分隔。当只有一个元素时,你可以推论出这个过程的结果就是它自身的第一个元素。
所以,最终我们得到
(数字 + 字符串 = 字符串):
1
+
"0"
=== "10"
(^0^)/耶!
结论
JS 是个变态语言!
[转载]git使用ssh密钥
转载自:git使用ssh密钥
git使用https协议,每次pull, push都要输入密码,相当的烦。
使用git协议,然后使用ssh密钥。这样可以省去每次都输密码。
大概需要三个步骤:
- 一、本地生成密钥对;
- 二、设置github上的公钥;
- 三、修改git的remote url为git协议
一、生成密钥对。
大多数 Git 服务器都会选择使用 SSH 公钥来进行授权。系统中的每个用户都必须提供一个公钥用于授权,没有的话就要生成一个。生成公钥的过程在所有操作系统上都差不多。首先先确认一下是否已经有一个公钥了。SSH 公钥默认储存在账户的主目录下的 ~/.ssh目录。进去看看:
$ cd ~/.ssh
$ ls
authorized_keys2  id_dsa       known_hosts config            id_dsa.pub
关键是看有没有用 something 和 something.pub 来命名的一对文件,这个 something 通常就是 id_dsa 或 id_rsa。有 .pub 后缀的文件就是公钥,另一个文件则是密钥。假如没有这些文件,或者干脆连 .ssh 目录都没有,可以用 ssh-keygen 来创建。该程序在 Linux/Mac 系统上由 SSH 包提供,而在 Windows 上则包含在 MSysGit 包里:
![]()
$ ssh-keygen -t rsa -C "<em>your_email@youremail.com</em>"
# Creates a new ssh key using the provided email # Generating public/private rsa key pair.
# Enter file in which to save the key (/home/<em>you</em>/.ssh/id_rsa):
直接Enter就行。然后,会提示你输入密码,如下(建议输一个,安全一点,当然不输也行):
Enter passphrase (empty for no passphrase): <em>[Type a passphrase]</em>
# Enter same passphrase again: <em>[Type passphrase again]</em>
完了之后,大概是这样。
Your identification has been saved in /home/<em>you</em>/.ssh/id_rsa.
# Your public key has been saved in /home/<em>you</em>/.ssh/id_rsa.pub.
# The key fingerprint is: # 01:0f:f4:3b:ca:85:d6:17:a1:7d:f0:68:9d:f0:a2:db <em>your_email@youremail.com</em>
这样。你本地生成密钥对的工作就做好了。

二、添加公钥到你的github帐户
1、查看你生成的公钥:大概如下:
$ cat ~/.ssh/id_rsa.pub
ssh-rsa AAAAB3NzaC1yc2EAAAADAQABABAQDx22Bj5dKvRhwFili/DIKqlcYPIVIGv04h0p0JG+0CZQrGk2iBV/0X+bGJXJFl3cgydfgzxV77qRfbQ8B8nXfTuvYbAttzbCj0U97Aj9/XX4ZxXDLLkbtLrZeOVM0NRAJkPb1/EznQ/rsm8gAyUZRLv+L8lqMaTSkAZiL1LggFASDDa2Rq9MbRaYUTzaL2Fmx0Hg8HKlPQiXhZ8U8wISLySPYzWpCvWBAcOCT5EbgrnqbD1W1Ec4XVutalh98LdDoBYzZO4T6D59ce1jiasIL1U/0Y6Nc3ZEDATfGLWKLnpRKZnxx42LG2cMhij4XZIFsL5lLh2bT+emVjkmRb64DJdr 326684793@qqcom
2、登陆你的github帐户。然后 Account Settings -> 左栏点击 SSH Keys -> 点击 Add SSH key

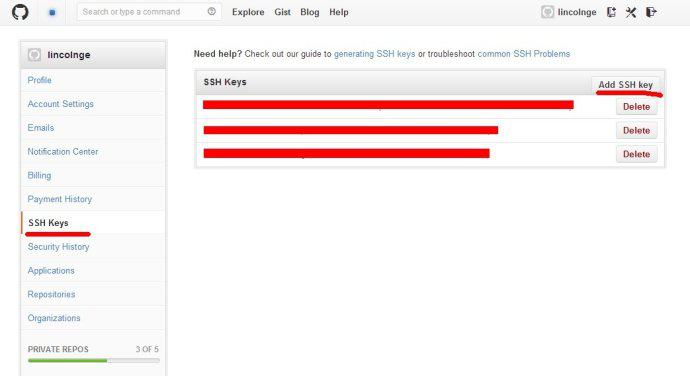
3、然后你复制上面的公钥内容,粘贴进“Key”文本域内。 title域,你随便填一个都行。
4、完了,点击 Add key。
这样,就OK了。然后,验证下这个key是不是正常工作。
$ ssh -T git@github.com
# Attempts to ssh to github
如果,看到:
Hi username! You’ve successfully authenticated, but GitHub does not # provide shell access.

就表示你的设置已经成功了。
三、修改你本地的ssh remote url. 不用https协议,改用git 协议
可以用git remote -v 查看你当前的remote url
$ git remote -v
origin https://github.com/someaccount/someproject.git (fetch)
origin https://github.com/someaccount/someproject.git (push
可以看到是使用https协议进行访问的。
你可以使用浏览器登陆你的github,在上面可以看到你的ssh协议相应的url。类似如下:
git@github.com:someaccount/someproject.git
这时,你可以使用 git remote set-url 来调整你的url。
$ git remote set-url origin git@github.com:someaccount/someproject.git
完了之后,你便可以再用 git remote -v 查看一下。

当git remote -v 之后变成类似这种git@github.com的形式,就说明用的是SSH协议进行访问。OK。
至此,OK。
你可以用git fetch, git pull , git push, 现在进行远程操作,应该就不需要输入密码那么烦了。
wubi 安装 Ubuntu
Ubuntu
Ubuntu(乌班图)是一个以桌面应用为主的Linux操作系统,基于Debian GNU/Linux,支持x86、amd64(即x64)和ppc架构,由全球化的专业开发团队(Canonical Ltd)打造的开源GNU/Linux操作系统。为桌面虚拟化提供支持平台。 百度百科
Ubuntu下载地址: http://www.ubuntu.org.cn/download/desktop
可以考虑12.04版本,当然也可以考虑新版13.04
用挂载下载的iso文件,我用的是DAEMON挂载
Daemon下载地址: http://www.daemon-tools.cc/chn/products/dtLite#features
打开挂载的文件夹 将wubi这个文件拷到任何位置,运行wubi,配置一些基本的设置,接着它就开始安装了,安装完后,提示重启,重启后在启动项上指定ubuntu,ubuntu将自动安装,安装完后将自动重启。
PS:
- 记得要挂载那个iso文件,不然wubi会重新下载ubuntu到某临时文件夹,这将耗费大量时间
- 可以考虑断网,因为有网络,ubuntu将需要下载安装一些必要的文件。不过断网的话,安装可能会出错,感觉这算是一个概率问题。
- 另外13.04的版本的wubi貌似对应的是64位系统,这意味着,你的镜像挂载要挂载64位系统版本的ubuntu,不然它会联网下载64位Ubuntu。
倘若ubuntu开机进不了桌面,可以通过重装桌面修复它。
ubuntu12.04已经自带了ibus输入法框架和一些中文输入法。 想要谷歌输入法可以移步到 ubuntu 下的 google 拼音输入法
bin/bash --login/
If you run “rvm use XXX”
then output “‘/bin/bash –login’ as the command”

1. Open a terminal,
2. Choice the drop-down menu 'Edit'
3. Click the menu 'Profile Preferences'
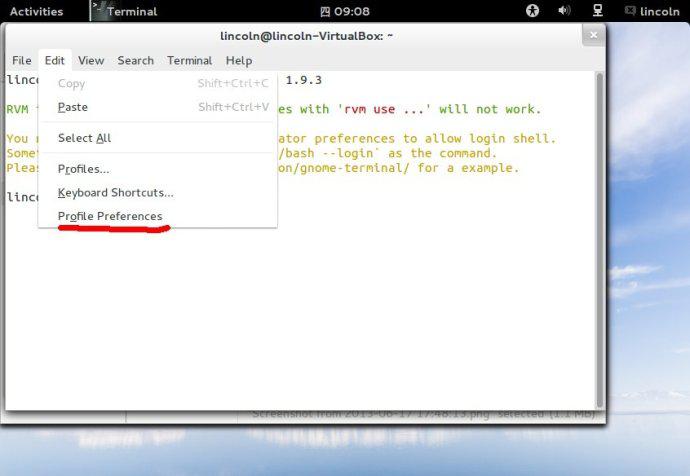
4. Choice 'Title and Command'
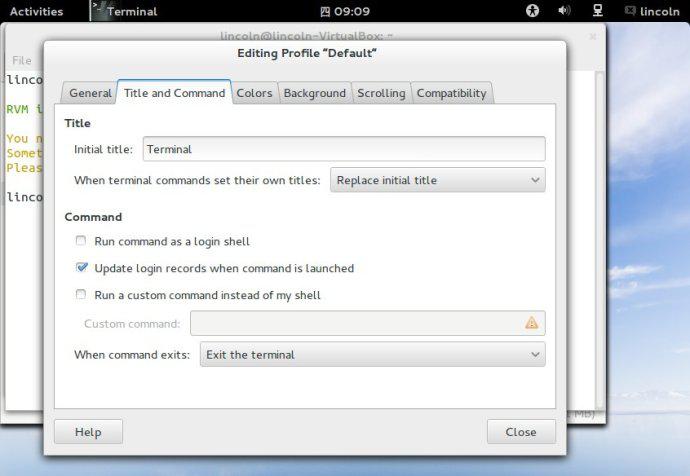
5. Click the command 'Run command as a login shell'
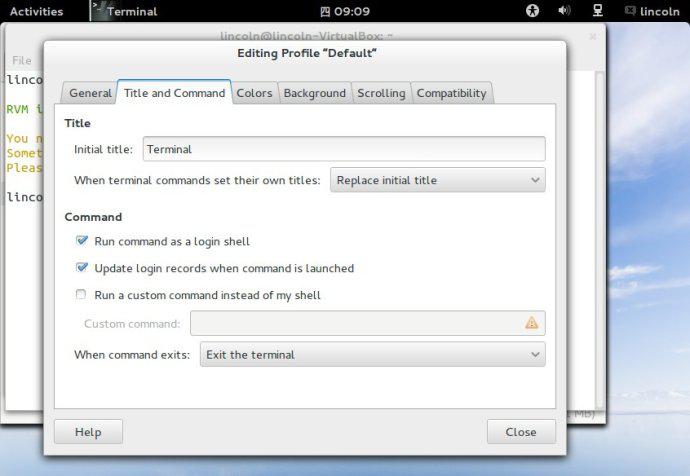
Then you can't run '/bin/bash --login' next time.
Reference:
- Integrating RVM with gnome-terminal https://rvm.io/integration/gnome-terminal
Ubuntu 配置安卓
有问题看问题解答.
首先下载 Android SDK
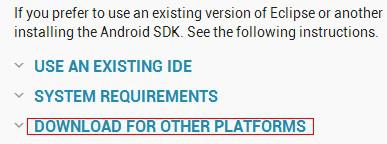
Android SDK官方下载地址:http://developer.android.com/sdk/index.html
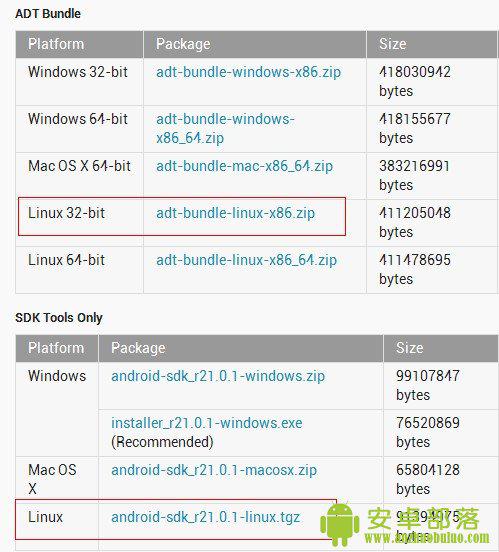
下载Linux 32-bit版本 .
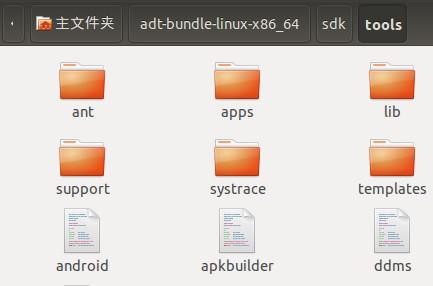
解压 然后到目录下的tools里面
输入$ ./android启动Android SDK Manager
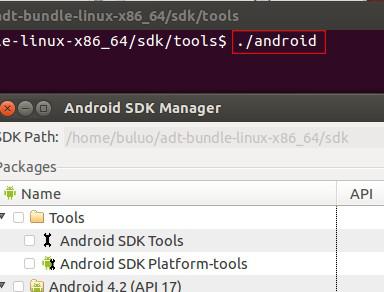 勾中Tools和Android 4.2(API 17),还可以安装以前的Android 4.1.2或者2.3版本,一般我们选择最新版本就好了,因为选择的版本越多下载时间就越长。SDK可以向下兼容, 意思就是4.2版本可以运行2.3 不过2.3 不一定可以运行4.2
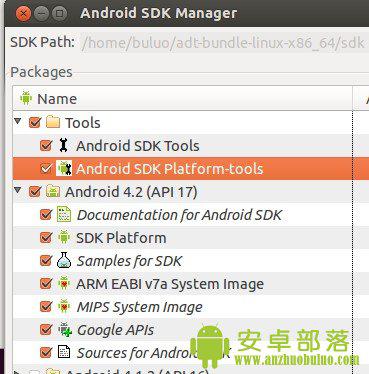 选中后,点击右下角的Install 5 packages…
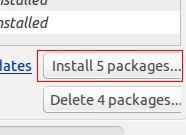
这时就开始在线下载文件了,时间会比较长,中途如果弹出错误窗口也不用管,等待下载完成。
跟windows环境安装安卓模拟器不一样,linux环境下需要用命令来建立模拟器。
首先在终端中输入
$ ./mksdcard 512M mysd01
上面的512M是指虚拟机的SD卡大小,mysd01是指卡的名称,大小和名称可以更改为别的。
$ ./android create avd -n myphone01 -t 2
创建虚拟手机设备,这里的myphone01是指虚拟机名称,也可以更改。

出现上面这种提示就表示模拟器建立好了
Auto-selecting single ABI armeabi-v7a
Created AVD 'myphone01' based on Google APIs (Google Inc.), ARM (armeabi-v7a) processor,
with the following hardware config:
hw.lcd.density=240
vm.heapSize=48
hw.ramSize=512
最后运行模拟器
$ sudo ./emulator @myphone01 -sdcard mysd01 -scale 0.8
不过上面这一块其实不用处理的, 因为你只要直接插上手机, eclipse运行的程序直接在手机上面跑.
问题解答:
一开始敲入这个命令: $ ./android
bash: ./android: 权限不够
chmod a+x 可以增加权限
输入: $ chmod a+x ./android
然后输入 $ ./android 即可.
Failed to get the adb version: Cannot run program "/media/m_backup/Setup_Files/Programing/android-sdk-linux/platform-tools/adb": java.io.IOException: error=13, 权限不够 from '/media/m_backup/Setup_Files/Programing/android-sdk-linux/platform-tools/adb' - exists=true
在sdk文件夹里面输入~/android-sdk$ sudo chmod -R a+wrx *
注意: 因为坑爹的XX墙, 所以改HOSTS进 https://developer.android.com/sdk/index.html
References:
- ubuntu下编译Android出现的问题 URL
- ubuntu系统安装安卓模拟器(Android SDK)的方法 http://www.anzhuobuluo.com/android/rom/142/
- Ubuntu配置Eclipse + Android环境问题 (安卓adb权限问题) http://bbs.csdn.net/topics/390062677
Java Problem
error 1: failed to load the jni shared library jre bin client jvm.dll
你安装的JDK版本就不对,对应你64位电脑的版本名称是 jdk-7-windows-x64.exe
C#代码生成label和button
//自动生成label
for (int x = 0; x < 5;x++ )
{
    Graphics
     dc = CreateGraphics();
    Show();
    Pen bluePen = new Pen(Color.Blue, 3);
    dc.DrawRectangle(bluePen, x*80, 0, 50, 50);
}

int _Height = 0;

for (int i = 0; i < 10; i++)
{
    Label sy = new Label();
    sy.AutoSize = true;
    sy.Location = new Point(0, _Height);
    _Height += sy.Height;
    sy.Text = i.ToString();
    Controls.Add(sy);
}

//生成button
Button[] buttons = new Button[50];
// for (int i = 0; i < 5; i++) // 只产生5个button
for (int i = 0; i < classroom_name_init.Length; i++)
{
    int t_y = i / 10;
    int t_x = i % 10;
    if (classroom_name_init[i] != null)
    {
        buttons[i] = new Button();
        buttons[i].Name = "button" + i;
        // buttons[i].Text = buttons[i].Name;
        buttons[i].Text = zone_name_init + classroom_name_init[i];
        buttons[i].Size = new Size(60, 25);
        buttons[i].Location = new Point(110 + 70 * t_x, 210 + 50 * t_y);

        //panel1.Controls.Add(buttons[i]);
        buttons[i].BringToFront();//置于顶层
        buttons[i].Click += new EventHandler(Buttons_Click);
    }
    else
    {

    }
}
this.Controls.AddRange(buttons);

//生成的button有按键效果
void Buttons_Click(object sender, EventArgs e)
{
    date_str = comboBox3.Text + " " + comboBox4.Text + "-" + comboBox5.Text;
    this.Text = (sender as Button).Text;
    Classroom classroom = new Classroom(zone_name_init, classroom_name_init, this.Text, date_str);
    this.Hide();
    classroom.ShowDialog();
}
关于 android 报 exception 的问题
android 程序只要你写错了就报异常,莫名其妙退出
所以可以考虑用 try-catch 的形式抓取异常, 然后很多时候你感觉哪里出异常了,不过实际上是另外一个地方出现异常 在安卓里面 onPause 在你调用别的 layout 的时候有可能就会出现异常